【Swift5】UITableViewの編集モード、スワイプアクションについてまとめてみた
2020.03.09

こんにちは、せんだです。
最近はもっぱらSwiftを使ったiOS向けのスマホアプリの開発を担当しているのですが、その中でよく使うUI部品としてUITableViewがあります。
今回はそんなUITableViewで使える編集モード、スワイプアクションついて書きたいと思います。
UITableViewの基本的な使い方についてはむつたくのこちらのブログを参考にしていただければと。
それでは早速書いていきますー。
今回やること
- UITableViewの編集モード
- UITableViewのスワイプアクション
- UITableViewのスワイプアクションのカスタマイズ
環境情報
- macOS Catalina(10.15.2)
- Xcode 11.3
- Swift 5.1
- iOS 13.3
UITableViewの編集モード
UITableViewには最初から編集モードというものが用意されています。
編集モードって何ぞやについてですが、こんなの↓の事を編集モードと呼んでいます。
1. 編集ボタンの設置
まずは編集モードへ遷移する為のボタンの設置方法です。今回はナビゲーションの右側にEditボタンを設置します。こんな感じのコードになります。
※tableViewという名前でUITableViewを設置しておく前提
[cc_swift]
class ViewController: UIViewController {
var tableData:[String] = [
“1. Apple”,
“2. Swift”,
“3. iPad”,
“4. iPhone”,
“5. MacBook”
]
// tableViewという名前でUITableViewを設置しておく前提
@IBOutlet weak var tableView: UITableView!
override func viewDidLoad() {
super.viewDidLoad()
tableView.dataSource = self
tableView.delegate = self
// ↓のコードを記述する
// 複数選択を可能にする
// falseの場合は単一選択になる
tableView.allowsMultipleSelectionDuringEditing = true
// ボタンの設定
navigationItem.rightBarButtonItem = editButtonItem
}
override func setEditing(_ editing: Bool, animated: Bool) {
super.setEditing(editing, animated: animated)
tableView.isEditing = editing
print(editing)
}
}
extension ViewController: UITableViewDataSource {
func tableView(_ tableView: UITableView, cellForRowAt indexPath: IndexPath) -> UITableViewCell {
let cell: UITableViewCell = tableView.dequeueReusableCell(withIdentifier: “cell”, for: indexPath)
cell.textLabel!.text = self.tableData[indexPath.row]
return cell
}
func tableView(_ tableView: UITableView, numberOfRowsInSection section: Int) -> Int {
return self.tableData.count
}
}
[/cc_swift]
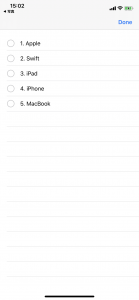
表示された「Edit」ボタンをタップすると編集モードに状態遷移すると思います。「Done」をタップすると元の状態に戻ります。
画面はこんな感じです。
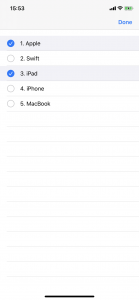
2. 編集モードで選択中のリストを取得する
編集モードに遷移後、TableViewのリストから選択した時、選択解除した時に呼ばれるデリゲートメソッドがこちら。
[cc_swift]
extension ViewController: UITableViewDelegate {
// 選択時のデリゲートメソッド
func tableView(_ tableView: UITableView, didSelectRowAt indexPath: IndexPath) {
// 選択した行番号が出力される
print(indexPath.row)
}
// 選択解除時のデリゲートメソッド
func tableView(_ tableView: UITableView, didDeselectRowAt indexPath: IndexPath) {
// 選択した解除した行番号が出力される
print(indexPath.row)
}
}
[/cc_swift]
このメソッドの中で対象の要素を配列に追加するなどの処理を書けば、選択中のリストの取得が可能です。
画面イメージはこんな感じ。
編集モードに関する基本的な実装方法は以上です。
UITableViewのスワイプアクション
次に、最近良く見かけるようになったスワイプアクションでの削除を実装してみたいと思います。
ちなみにここで言っている削除というのはあくまで画面表示上での削除のみで、DBなどを使っている場合はデリゲートメソッドの中で別途処理が必要になります。
UITableViewでのスワイプ時に呼び出されるデリゲートメソッドはこちらです。
[cc_swift]
extension ViewController: UITableViewDelegate {
func tableView(_ tableView: UITableView, commit editingStyle: UITableViewCell.EditingStyle, forRowAt indexPath: IndexPath) {
// 先にデータを削除しないと、エラーが発生します。
self.tableData.remove(at: indexPath.row)
tableView.deleteRows(at: [indexPath], with: .automatic)
}
}
[/cc_swift]
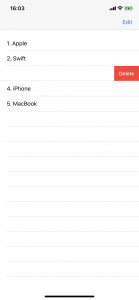
上記のコードを記述するだけで、スワイプ時に削除処理が実行されるようになります。
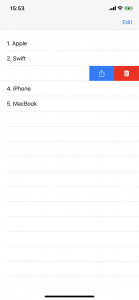
画面イメージはこんな感じ。
UITableViewのスワイプアクションをカスタマイズする
先ほどはスワイプアクションに対して削除だけを実装する方法を紹介しましたが、その他にもスワイプをトリガーに処理を行いたい場合があるかも知れませんね。
そんな時は下記のようにスワイプアクション設定用のデリゲートメソッドを利用して実装します。今回はスワイプ時にシェア用のボタンと削除用のボタンが表示されるように設定してみたいと思います。
ちなみにここではスワイプのみでの削除は無効化しています。
[cc_swift]
extension ViewController: UITableViewDelegate {
func tableView(_ tableView: UITableView, trailingSwipeActionsConfigurationForRowAt indexPath: IndexPath) -> UISwipeActionsConfiguration? {
// シェアのアクションを設定する
let shareAction = UIContextualAction(style: .normal , title: “share”) {
(ctxAction, view, completionHandler) in
print(“シェアを実行する”)
completionHandler(true)
}
// シェアボタンのデザインを設定する
let shareImage = UIImage(systemName: “square.and.arrow.up”)?.withTintColor(UIColor.white, renderingMode: .alwaysTemplate)
shareAction.image = shareImage
shareAction.backgroundColor = UIColor(red: 0/255, green: 125/255, blue: 255/255, alpha: 1)
// 削除のアクションを設定する
let deleteAction = UIContextualAction(style: .destructive, title:”delete”) {
(ctxAction, view, completionHandler) in
self.tableData.remove(at: indexPath.row)
tableView.deleteRows(at: [indexPath], with: .automatic)
completionHandler(true)
}
// 削除ボタンのデザインを設定する
let trashImage = UIImage(systemName: “trash.fill”)?.withTintColor(UIColor.white , renderingMode: .alwaysTemplate)
deleteAction.image = trashImage
deleteAction.backgroundColor = UIColor(red: 255/255, green: 0/255, blue: 0/255, alpha: 1)
// スワイプでの削除を無効化して設定する
let swipeAction = UISwipeActionsConfiguration(actions:[deleteAction, shareAction])
swipeAction.performsFirstActionWithFullSwipe = false
return swipeAction
}
}
[/cc_swift]
画面イメージはこんな感じ。
iPhoneのメールアプリみたいな感じに、スワイプした時に複数のボタンを表示する事ができました!
まとめ
いかがでしたか?
今回はSwiftでの開発で比較的良く使われるであろうUITableViewの編集モードとスワイプアクションの実装について紹介してみました。
これからSwiftでiOSアプリを開発しようと思っている方々の手助けになれば幸いです。
それでは、また!
↓↓↓ぜひチェックしてください
~提供中のヒューマンセンシング技術~
◆なりすまし判定技術
eKYC・顔認証のなりすまし対策を!
https://bio-check.pas-ta.io
◆まばたき検出技術
PCやスマホアプリに組み込めて高精度にまばたきを検出
https://blink.pas-ta.io
◆視距離推定技術
単一RGBカメラで、目からカメラまでの距離を推定
https://vd.pas-ta.io
◆虹彩認証技術
目の虹彩を利用した生体認証技術
https://iris.pas-ta.io
◆視線検出技術
アイトラッキングや次世代UIに
https://eyetrack.pas-ta.io
◆目検出技術
あらゆる目周りデータを高精度に取得
https://pupil.pas-ta.io